Knitting cables is an art form that many knitters can’t stay away from. It breaks up the monotony of knitting the same stitch over and over, and it’s a way to truly express your individuality in knitting because you can free form your own cables to fit your own style. While the technique may seem advanced, a standard rope cable is rather easy to create. All you need are the right tools and the time to practice to create your own beautiful cables to adorn your knit-work. Here you will find everything you need to know about knitting cables.
What are Cables?
Cables are the designs that you see on many knit garments. Many look like ropes twisting up a sweater or an intricate braided pattern on a scarf. Cables can come in many different designs, some much fancier than others. Some knitters are even able to make representations of Celtic knots and other designs with their cables. You can truly express your own artistic abilities by creating original cables in your knit-work.
Since cables are designed by twisting and bunching the knit fabric, the finished piece is thicker and bulkier than standard knit fabric. This makes cabling especially popular on winter pieces such as sweaters and scarves.
Tools Needed for Knitting Cables
If you’re interested in knitting cables, all you need is the set of knitting needles you use for your knitting and a cabling needle. A cabling needle is a needle specifically made for knitting cables. It is thinner than your knitting needles, and much shorter. It also has a “J” shaped curve in the center. This needle is used for holding stitches off of your needle during the cabling process.

Other than the cabling needle, you don’t need any special tools for knitting cables. With just a skein of your favorite yarn, a set of knitting needles, and a cabling needle, you can create beautiful knit fabric. Start out using cable patterns while you get used to the idea, and once you’ve gained some confidence in the art of cabling, you can begin creating your own designs.
How to Knit Cables
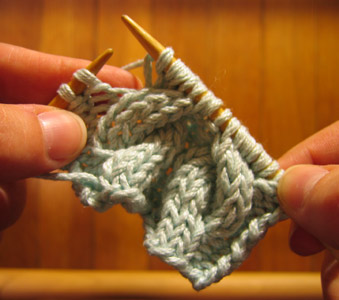
Cables are created by crossing one group of stitches over another to create a twist in the fabric. Many patterns use a combination of knit and purl stitches to create the rising and falling look common on cables.
In order to create a cable, you simply suspend a number of stitches on a cabling needle and then knit the same number of stitches on your left hand needle. You then transfer the stitches on your cabling needle back onto your left hand needle and knit those as well. This puts the stitches out of order on the needle and creates the twist.
The rope cable, which is the most basic cable, consists of two groups of stitches twisting back and forth in one column up the length of a piece of fabric. To make the cable twist to the left, you would simply hold your cabling needle in front of your work while you knit the stitches on the left hand needle. If you want your work to twist to the right, you would hold your cable needle behind your work. Be sure to keep the tension firm so that there isn’t any slack in the yarn, and you’ll end up with a beautiful rope twist in your work. Fortunately, you do not have to perform these steps on every row of a cable. Most cable patterns consist of a turning row, which is the row with the twist, followed by several plain rows before you turn again.
Cables are a popular way to make your knit-work truly unique. If you’re looking for a way to express your artistic side with your knitting, cables can be a fun and addictive way to do so. You can create so many different items with cables from blankets to sweaters and anything else. By practicing the twists and turns in the basic rope cable, you can learn the basics of knitting cables. Once you’ve mastered the basics of knitting cables, the design possibilities are endless.


