Many people ask me how they can start selling their knitting from their own blog or from knitting websites, so in this post I'll show you how easy it is to add a Paypal function to your knitting or crochet site to instantly start accepting payments for your goods or services – yay!
Many knitters and crocheters don't realise how easy it is to start making some money from their creations online. If you already have a website or blog, and you would like to start selling your products or services, then using Paypal's payment buttons is the fastest, easiest and possibly cheapest way to get started.
And you may not realise Paypal buttons can also give you the ability to collect donations for charity fund-raising (like sponsored knit-alongs) or even let people give gift certificates for your sites products!
First of all you need a Paypal account, which is easy and free to set up. Then when you log in, you'll see this screen, choose the “Merchant Services” tab (circled).
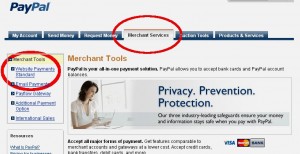
To create your payment buttons, choose “Website Payments Standard” (circled on the left).
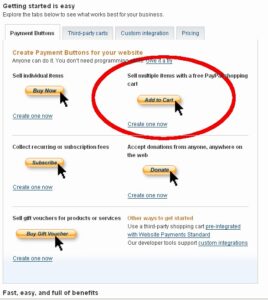 Now you have a few choices:
The “Buy Now” buttons will take people straight to the payment page and will not allow them to add anything else to their order. This button is for “once-only” product sales, and probably won't be as suitable for you as the free shopping cart option below.
The “Add To Cart” button allows people to buy many different products and as many of each product as they want. This encourages them to buy more than one thing at a time, which is always a good thing!
You can also set up a “Donate” button which allows you to collect donations over the web – this makes it much easier for people to support your fundraiser, and allows you to reach a world-wide audience with your cause.
Or you can include a “Buy Gift Voucher” button, which I think every knitting or crochet website should have – why not encourage people to give your products or designs as thoughtful gifts to friends and family who also love knitting and crochet?
For this exercise, we'll look at setting up the Add To Cart button, which will probably be the first one you use. So click on “Create One Now” as shown circled above.
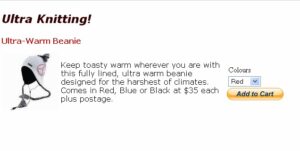
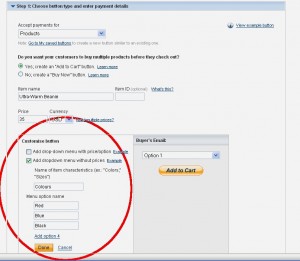 Step 1 on the next page allows you to customise your button to your needs. You need to create a separate “Add To Cart” button for each item you want to sell with the different price, payment currency and size/colour options for each. In the example below I have created my button for a US$35 beanie that comes in red, blue or black. You can add more than one of these drop-down menus if you also have size choices.
If you want to, you can use your own customised button images by putting in their URL in the “customise appearance” option.
Next add in the postage cost for that item (assuming it was bought as a single item) and choose the Merchant ID for transactions – the secure option uses your registered paypal email address as the ID, or you can choose another email address if you wish.
In Step 2 you can set up inventory tracking and profit and loss tracking which can be very handy. You will be alerted by email if the numbers of a certain product are low, and you can stop people ordering an item if it is out of stock.
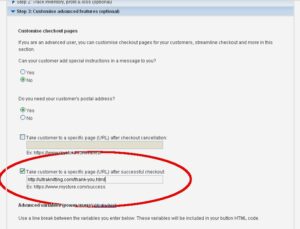 In Step 3 you can customise your check-out pages. You can allow customers to add in special instructions, and choose whether or not you want their postal address (for example, if you are selling knitting patterns as pdf's you may not need their postal address to provide the products).
Then you can choose where the customer will go once they have finished paying (circled here). If you are selling knitting patterns, you can upload the pattern or pdf to a specific page on your website and send them there once they have paid (so only people who have made a payment can view that page). If you are selling products you might like to set up a special “thank you” page which thanks them for their order and gives them information like approximate delivery times.
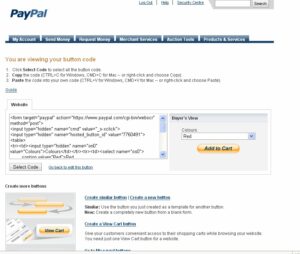 Finally click on “Create Button” at the bottom of the page and you will get some <html> code and a preview of the button (see below).
Now all you need to do is click on “Select Code” and “copy” (using Control C on your keyboard) then go to your web page and paste the code in where you want your button to appear.
I have included an example of what the code looks like on your web page below – I have pasted the script from Paypal (circled) into a table, and then the preview of what it looks like on the website is below that.

Now you know how to start taking payments for your products, gift certificates and donations – if this brings up any more questions, please post them below and I'm happy to help!

How do you get the word out or advertise your knitting/crochet website to knitters and crocheters?
How do you market your website without spending a lot of money?
Magazine advertising is very expensive. And so is Google Adwords.
Hi Kalena,
Great questions! We’ll be having a teleseminar covering these topics on Thursday, I’ll be posting a link where you can register your name to get access later today. I’ll also write a post covering these questions after the teleseminar so stay tuned!